Data Import
Importing Data into Blickshift Analytics is normal the first step that needs to be done before an analysis can start. Blickshift Analytics currently imports .csv files (and related formats like .tsv), i.e. text files in which data columns are separated by a common separator symbol. To start importing, Select "File - Import Data" from the main menu, press the "Import Data" button on the main tool bar, or select "Import Data" from the context menu of the "Data Sources" column in the workflow explorer.
The import process consists of five steps, each with its own window, which are connected by "Next" and "Back" buttons.
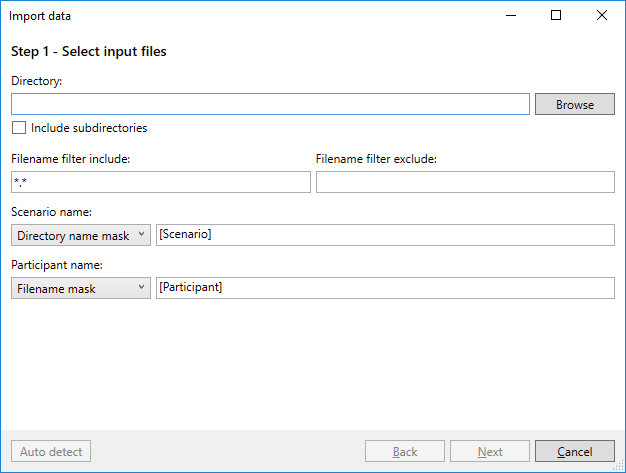
Step 1: Select Input Files
On this page you can select all files that are to be imported, and you can determine how their content is mapped onto scenarios and participants. It contains the following options:
- Directory:
- Determines the base directory from which files should be imported. All data files that you want to import should be in this directory or one of its subdirectories. If you use the "Browse" button, you can select one or several files. The directory in which the files reside will be set as the base directory. If you select several files, Blickshift Analytics will try to automatically set the Filename Filter Include option accordingly.
- Include Subdirectories:
- If selected, also import all files residing in subdirectories of the selected directory, if they fulfill the Include and Exclude filters.
- Filename Filter Include:
- A filename filter for all the files you want to include. In the simplest case (e.g. when you select several files with the "Browse" button) this is a space-separated list of filenames. Note that the filenames need to be enclosed in quotation marks if they contain spaces. The filter can contain the wildcard character * to signal that any none, one or several arbitrary character(s) can be in its place. Let's assume you have a number of files called "Particpant1.csv", "Participant2.csv", …, "Participant35.csv". If you set the include filter to "Participant*.csv", all of those files will be selected.
- Filename Filter Exclude:
- A filename filter for all the files you want to exclude from your selection. This filter is applied after the include filter, i.e. you can "deselect" some files from all the files selected by the include filter. In the example, if you set the exclude filter to "Participant*9.csv", all the files ending with a 9 will not be included.
- Scenario Name:
- Determines, how the data maps onto scenarios. The scenario name selection consists of a combo box and a text box. Blickshift Analytics will try to guess the correct settings from the files you have selected, but it is possible that you will need to set this manually. The combo box offers the following options:
- Fixed
- The data consists of only one scenario. You can set the name of the scenario in the text box.
- Directory Name Mask
- The files reside in subdirectories, and each subdirectory (or a part of a subdirectory name) signifies one scenario. In the text box you can set how the directory names map onto scenario names. Setting it to just "[Scenario]" will name each scenario like the directory name, but you can use other characters and the wildcard * in order to restrict the scenario name to just parts of the directory name. So, if your directories are called "ABC_ScenarioX" (where X is a number), you can use "*_[Scenario]" to have the scenarios called just "ScenarioX".
- Filename Mask
- The name of the scenarios can be found in the filename. Use the placeholder [Scenario] and the wildcard * in the text box to map the filenames to scenarios. E.g. if your filename has the pattern ScenarioX_ParticipantY.csv (where X is a number), use "[Scenario]_*" to have your scenarios called "ScenarioX".
- File Header
- The name of the scenario can be found in the header (the first lines of) the files. In Step 2 you can determine how the scenario name is read from the file header.
- Data Column
- One file can contain more than one scenario, but the current scenario is available in one of the data columns in the file. Note that the respective column needs to be set in Step 3.
- Participant Name:
- Determines how the data maps onto participants. The participant name selection consists of a combo box and a text box. Blickshift Analytics will try to guess the correct settings from the files you have selected, but it is possible that you will need to set this manually. The combo box offers the following options:
- Fixed
- The data consists of only one participant. You can set the name of the participant in the text box.
- Directory Name Mask
- The files reside in subdirectories, and each subdirectory (or a part of a subdirectory name) signifies one participant. In the text box you can set how the directory names map onto participant names. Setting it to just "[Participant]" will name each participant like the directory name, but you can use other characters and the wildcard * in order to restrict the participant name to just parts of the directory name. So, if your directories are called "ABC_ParticipantY" (where Y is a number), you can use "*_[Participant]" to have the participants called just "ParticipantY".
- Filename Mask
- The name of the participants can be found in the filename. Use the placeholder [Participant] and the wildcard * in the text box to map the filenames to participants. E.g. if your filename has the pattern ScenarioX_ParticipantY.csv (where Y is a number), use "_[Participant]." to have your participant called "ParticipantY".
- File Header
- The name of the participant can be found in the header (the first lines of) the files. In Step 2 you can determine how the participant name is read from the file header.
- Data Column
- One file can contain more than one participant, but the current participant is available in one of the data columns in the file. Note that the respective column needs to be set in Step 3.
- File List:
- A preview list of all the files that will be imported, and how they map onto scenarios and participants. This list is automatically updated each time one of the input elements above loses focus.
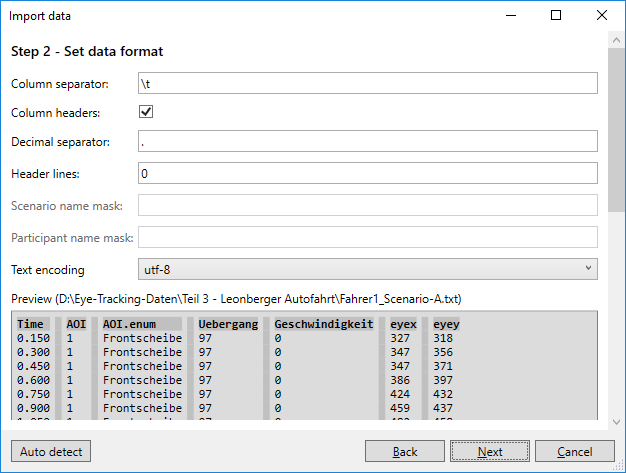
Step 2: Set Data Format
In this step, the data format inside the files is determined. Normally, the settings of these fields are detected automatically, and a bar at the bottom shows the progress of the auto detection. If for some reason the auto detection is not running (e.g. because you have canceled it before), you can always re-start it by clicking the "Auto Detect" button on the bottom left corner. Auto detection can take a considerable amount of time, because all files are being parsed completely. If you are sufficiently sure that all files are in the same format (or you know what needs to be set in the options below), you can skip the auto detection after an initial phase by clicking the "Stop" or the "Next" button.
This page of the import dialog has the following options:
- Column Separator
- The character that separates columns. Use \t for tab-separated columns.
- Column Headers
- Check this, if the first line of columns does not contain data, but headers for the columns. These headers will be used as the default names for the columns in Step 3.
- Decimal Separator
- The character used as decimal separator for non-integer numbers.
- Header Lines
- Some files contain lines at their beginning that do not adhere to the column format of the rest of the file. Set the number of lines that should be ignored by the importer here.
- Scenario Name Mask
- This mask is used to find the scenario name in the file header. E.g. if your file header contains the scenario name in the format "Scenario: XYZ," where "XYZ" is the scenario name, write "Scenario: [Scenario]," to read the scenario name from the file headers. This setting is only available if you have set Scenario Name to "File Header" in Step 1, and it only makes sense if Header Lines is greater than zero.
- Participant Name Mask
- This mask is used to find the participant name in the file header. E.g. if your file header contains the participant name in the format "Participant: ABC," where "ABC" is the participant name, write "Participant: [Participant]," to read the participant name from the file headers. This setting is only available if you have set Participant Name to "File Header" in Step 1, and it only makes sense if Header Lines is greater than zero.
- Text Encoding
- The text encoding format of the files that are to be imported.
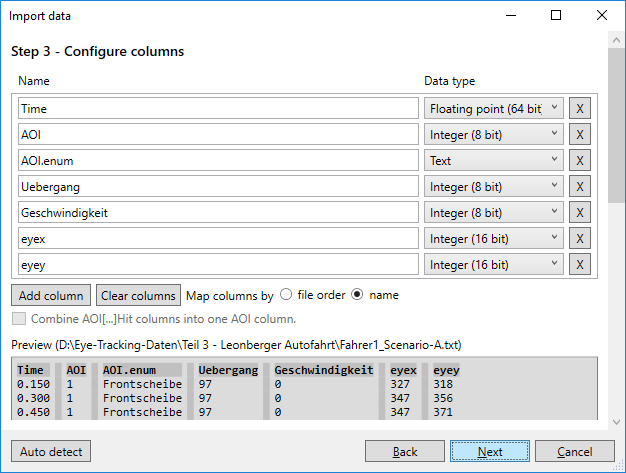
Step 3: Configure Columns
In this step, it is determined how the columns are imported into Blickshift Analytics. Normally, the settings of these fields are detected automatically, and a bar at the bottom shows the progress of the auto detection. If for some reason the auto detection is not running (e.g. because you have canceled it before), you can always re-start it by clicking the "Auto Detect" button on the bottom left corner. Auto detection can take a considerable amount of time, because all files are being parsed completely. If you are sufficiently sure that all files are in the same format (or you know what needs to be set in the options below), you can skip the auto detection after an initial phase by clicking the "Stop" or the "Next" button.
This step provides a list of all columns that have been detected in the data, with their name and their data type. In most cases you do not need to change anything here, if auto detection has run. If "Scenario Name" or "Participant Name" has been set to "Data Column" in Step 1, the columns that contain scenarios or participants can be selected here.
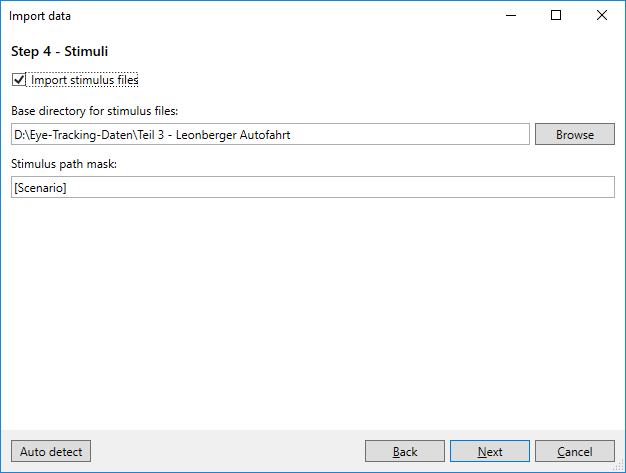
Step 4: Stimuli
This step allows importing media files (normally stimuli) and linking them to scenario/participant combinations automatically. This step is optional, but it is helpful, if you are handling a lot of files and don't want to link the stimulus files to the scenario/participant combinations (see Project Manager: Stimuli).
The automatic import of media files assumes that their names (or paths) contain the names of the scenarios and/or stimuli that have been determined in earlier steps. If you want to import stimuli, check the "Import Stimulus Files" checkbox. The location of the stimulus files is assumed to be the concatenation of the Base Directory and the Stimulus Path Mask, in which [Scenario] is replaced by the scenario name and [Stimulus] is replaced by the stimulus name.
Let's assume you have a base folder for your experiment, called c:\experiment. Let's further assume the stimulus files are located inside subfolders named "Stimuli_for_ScenarioX" (where "ScenarioX" are the names of the scenarios determined in the previous steps), and the stimulus files in those folders are called "Stimulus_ParticipantY.png" (where "ParticipantY" are the names of the participants determined in the previous steps). Then you would set Base Directory to "c:\experiment" and the Stimulus Path Mask to "*_*_[Scenario]\*_[Participant].png".
Step 5: Importing Data
During this step the data is imported into Blickshift Analytics. You cannot set any options here. If there are errors during the import process, they are logged into "Messages" field. These errors can occur if you have set data formats or column types that do not conform with what is found in the files being parsed, or you have aborted the auto detection process too early and therefore wrong values persisted for data formats or column types.


